Sunday, September 30, 2012

Slow Cooker Apple Butter Recipe (Sugar Free!)


Well, fall is in full swing here in Washington! Last week I visited my sweet friend Amy, who took me apple picking in her yard straight from her beautiful apple tree with her!  I actually climbed to the top of the tree to get the most ripe apples I could find (this is a big deal for me... I'm a big baby about heights!).  And we picked about 30 apples for our Apple Butter making adventure.

For our first batch of Apple Butter, we followed this recipe that I found on Pinterest.  And while on the one hand it was absolutely delicious, on the other hand my nagging conscience had me stressing out about the amount of sugar that went into making this batch!  So, I set out to make our second batch without any sugar.  I searched and searched for a recipe online, but was not finding what I was looking for. So instead, I followed this guide on how to substitute sugar with Stevia, and I came up with my own spin off of the original recipe I followed.


Sugar Free Apple Butter

Ingredients
  • 13 Cups of Apples: peeled, cored, and sliced thin
  • 1 tsp Stevia Extract Powder (I used Trader Joe's brand)
  • 5 heaping Tbsp Raw Honey
  • 2 tsp Cinnamon
  • 1 1/2 tsp Nutmeg
  • 1 1/2 Cups (no sugar added) Apple Cider *you may need a little more to add to the mixture as it heats

Directions
Prepare your apples (I used a handy dandy Apple Peeler Corer Slicer!), put them in your crock pot.  Sprinkle Stevia, Cinnamon, Nutmeg, and Honey on top. Pour cider over top, and mix ingredients together. Turn crock pot on high and cook for 5-7 hours, and add more apple cider, if needed to reach desired consistency.  The butter should be boiling when you're ready to can.  I personally chose to can mine in 8oz jars. I followed the instructions in this video for canning with a water bath.

 
I love this recipe, because there's NO sugar!

However, because there is no sugar in this recipe, the consistency turns out more like an apple sauce than an apple butter (not as gewy as normal apple butter).  If you come up with a way to make the recipe without sugar (or crappy sweeteners like Splenda - yuck!) and get it to a better consistency, please let me know, I'd love to try your version!


Sunday, September 16, 2012

Treasure Basket: Baking

So far, I have made 2 baskets and have only used one.  So, I'm going to show you that one today.
"Baking" Treasure Basket
What's in the Basket:
  • Whisk
  • Wooden stirring spoon
  • Pot holder
  • Mixing bowl & lid
  • Paper muffin liners
  • Foil stars
  • Measuring cups (1 glass, 1 plastic)
  • 2 Measuring spoons in individual sizes
  • I added a couple more items after this picture was taken:
  • A large metal stirring spoon
  • One of those food mashers, metal with a wooden handle
Kendrick had a blast playing with this, and lasted about 30 minutes (awesome, I did not expect him to be entertained that long!) just completely intrigued with everything inside!

You can see the masher, and the spoon that I added here.
He was so into what he was doing that he didn't even notice Mommy taking pictures!

What I like about these baskets is that while Kendrick is able to explore these items and learn about his senses, I am also able to sit down and play with him, and teach him while I do.  We discuss which items are bigger & smaller.  We made music with the spoons & things.  And we (I) talked about the differences in the textures and what each thing is used for in the kitchen.

This is definitely NOT something I will leave him unsupervised with.  He still likes to explore with his mouth quite a bit, and has come up with very creative ways to use some of the things that could be dangerous.  So, I recommend if you are thinking of making something like this to make sure to monitor your children closely with these!! :) 

If you would like to learn more about Treasure Baskets, and how to make them, click here!

Thank you for reading!!

xoxo
Heidi

You might also enjoy:

Treasure Baskets:
Getting Started

Treasure Baskets: Getting Started

As we began the school year this year, my first year "homeschooling" Kyla (4), I was not sure how I was going to include my 22 month old son, Kendrick, on our school days.  I started doing some research on some blogs... and this is what I found: Treasure Baskets!  Generally, Treasure Baskets can be used from the time a baby can sit up on their own, and grab things.  Kendricks baskets will be different from the kind of basket a 6-12 month old might use, as his will be aimed more for toddler age.

The idea behind the Treasure Basket is to include a variety of items in different shapes, colors, sizes, and textures.  This is to explore the sences, and can also be used to teach your child new things through play.

If you would like to create a Treasure Basket there are so many resources out there, with great ideas to get you started! Feel free to check out some of the places I've visited (keep reading to see). Don't be shy to get creative and think up your own ideas if you're contemplating! Or, you can just straight copy the ideas from these baskets.  The great thing here is that these are easy to make, and can be so cheap, or even FREE... because you should be able to find so many things around your home that will work for these!

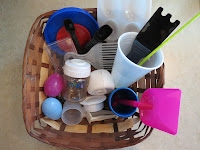
"Plastics" Treasure Basket


Treasure Basket blog ideas to get you started:
If you're going to make a basket you should probably want to leave out any potentially dangerous items (you know the lighter, matches, needles, knives, windex, lead... stuff they can choke on, poison themselves with... or possibly burn themselves or the house down with).    SAFETY FIRST!  It is important to be near by and watching your child(ren) closely as they experiment with the items you put in their baskets.  I also read somewhere to make sure if you're going to add something leather in there to ensure that it's genuine leather, the fake stuff can be toxic.  Just use common sense, and if you're not sure, leave it out... or google it?

Anyway... in case you are wondering, I plan to make 1-2 new Treasure Baskets per week. I imagine I will most likely end up repeating some of the baskets and re-using alot of the materials in future baskets. I had fun searching the house high and low for basket fillers this week. And it actually got me organizing little spots in the house that had gone unnoticed (imagine that) for a while.

There really is SO MUCH you can do with these Treasure Baskets, and they can be such a great teaching tool if you want to get more involved. The great thing is that they are so versatile! If you make a Treasure Basket that you want to show off, share, or brag about, please email me pictures and a description, as I would love to feature you on my blog!

xoxo
Heidi

Wednesday, September 12, 2012

September Sensory Bins

This is the first time we've ever done Sensory Bins.  I plan to make a new one (or 2) every month.  They will most likely go along with the season.  I imagine that as I continue to make more I will learn to get more and more creative with what to put in them. These are a big hit with the kids so far, and I am happy to show you them!  Originally I was going to just make one a month, for Kyla (I thought Kendrick might be too young).  However, I realized that plan was incomplete, as soon as Kendrick noticed what she had going on! So, I decided to make 2 a month, and the kids will take turns playing with them.  This month they have the same basic items, just in different colors. 

Here is the first one I made:
Sensory Bin #1
And here is the 2nd:
Sensory Bin #2
What's inside the bins:
  • Scrunchy Confetti paper (I have no idea what the actual name for it is)
  • Styrophome Squashes
  • Fall colored slinkies
  • Colorful leaf foam stickers
  • Nylon leafs (I picked these off of stems from fake flowers)
  • Brown paper bag
  • Orange plastic pumpkins
  • 2 Polka dot print cloth ribbons
Everything inside these bins, excluding the ribbons, were found at my local Dollar Tree store.  The little bins were purchased at Wal-Mart.  And, I believe my sister bought the ribbons for me a couple years ago in the little dollar section in Target.

I'm looking forward to making more of these, and will be posting every month when I do! I got the idea for these on one of my favorite homeschooling blogs, Counting Coconuts!  If you have any questions, or ideas, please feel free to comment!

Thursday, September 6, 2012

Week 1 of Preschool at Home

So far, we're off to a great start for the year! We are easing our way into school gracefully, with just 2 short days this week.  We're following a schedule that has us working on one letter a week, one number a week, and a color of the month.   Anything beyond that we will start adding into the curriculum once we get the hang of the school days, and have a solid routine.

Letter of the week: A
Number of the week: 1
Color of the month: Red

I'm excited to share with you how we are approaching this!

Kyla is memorizing a verse of the Bible every week that goes along with the letter of the week. 

This week we used Psalm 17:8 "Keep me as the Apple of your eye."  Along with that, we incorporated lots of apple themed stuff to go along with the verse she is learning.  We discussed what kinds of things we can do with apples, and she helped me bake this Apple Chips recipe I found on Pinterest.  And, we're planning to bake Apple Pie together next week.  It's still a little too hot outside for the next few days for us to turn the oven on that high.


Another thing we did with the color red, and the number '1', was coloring this picture of a red
barn.  It had one horse in it, and she practiced tracing the number '1' on the bottom of the page.


With Kendrick, I'm still figuring out how to get him involved and learning things alongside Kyla, so that he feels a part of school.  He has a huge desire to be a part of everything she's doing, and is even trying to recite her Bible verse with her.  This week I let him color pictures of apples, talked with him also about the color red, and let him play with stickers.   I'm working on putting a couple of bins together with special learning items for Kendrick to play with during the school day, I will be posting this soon!


Kendrick had a little trouble getting the stickers apart from the paper, so I had to peel each of the stickers back a bit before giving him the sticker sheet.


Last, but not least, this cute little CD came as a gift from my sweet neighbor friend. This has all the letters and Bible verses we'll be working on through the year, along with a catchy little tune to help the kids have fun memorizing.  So, in the morning before we start our school day, the kids get all their wiggles out wihle listening to this in the livingroom.  They are both already starting to sing along.  So adorable!